Gender Reveal Invitation Ideas: Wording, Themes, and What to Include
A gender reveal invitation should make guests excited about the celebration while giving them everything they need to show up prepared. It can be playful, elegant, seasonal, colorful, or completely neutral—the design does not have to follow one familiar formula.
Although these celebrations are commonly called gender reveals, what is usually being shared is information about a baby’s sex. Sex and gender are not quite the same thing, so families can also use terms such as “baby reveal” or simply “a special surprise” if that feels more natural to them.
What to Include on a Gender Reveal Invitation
A creative headline may catch someone’s attention, but the practical details are what make an invitation useful. Make sure guests can quickly find:
- The parents-to-be or guests of honor
- The host’s name, when someone else is organizing the party
- The date and start time
- The venue and full address
- How to RSVP
- An RSVP deadline
- Any dress, color, parking, food, or activity instructions guests need to know
If the reveal is part of a baby shower, say so clearly. A guest should not have to guess whether the invitation is for a stand-alone reveal, a shower, or one celebration combining both.
When choosing an RSVP deadline, leave enough time to finalize food, seating, supplies, and any personalized party details. For many gatherings, asking for responses around two weeks before the event gives the host a useful planning cushion.
20 Gender Reveal Invitation Ideas
The best invitation ideas are easy to picture before you ever start designing them. Think about the colors, illustration style, typography, and one small detail that gives the invitation personality. These 20 ideas range from traditional and playful to modern, seasonal, and understated.
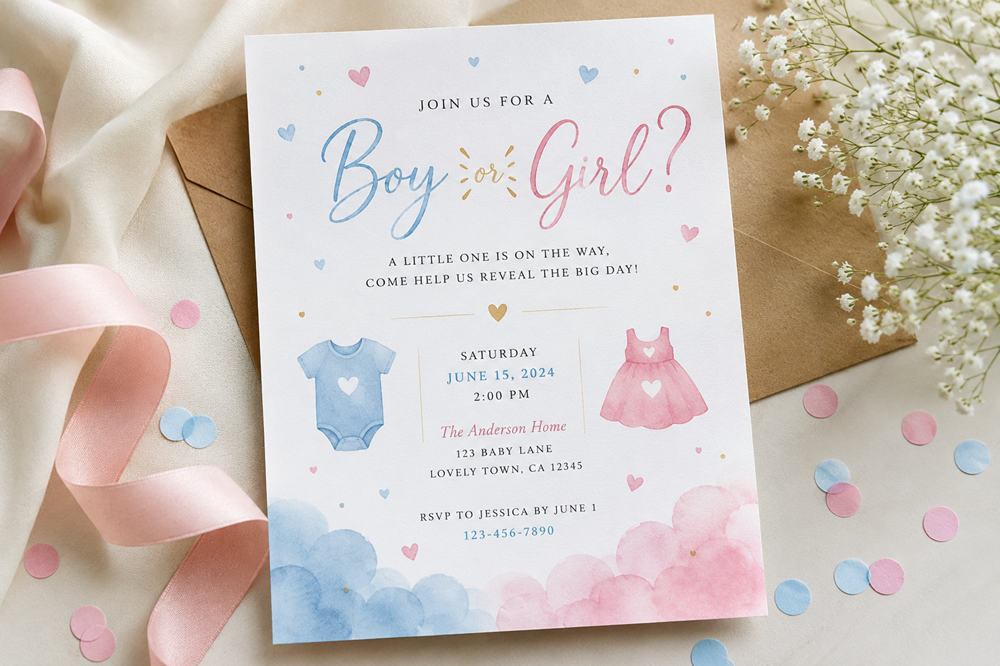
1. Classic Pink and Blue Watercolor
Start with a warm white or cream background and let two loose watercolor washes—dusty pink on one side and powder blue on the other—meet softly in the middle. Place the words “Boy or Girl?” in large charcoal or gold lettering at the center, with the parents’ names and party details neatly underneath.
Instead of filling every corner with baby icons, add just a few tiny painted stars or dots around the border. The result keeps the familiar pink-and-blue reveal idea but feels softer and more polished than a sharply divided card.
2. Team Boy or Team Girl
Give the invitation the look of a friendly competition. Divide the card vertically, with a blue pennant marked “Team Boy” on one side and a pink pennant marked “Team Girl” on the other. A bold headline such as “Pick Your Team!” can sit across the top.
At the bottom, add a small line inviting guests to arrive wearing the color that matches their prediction. This design works particularly well when guessing will be part of the party itself.
3. Twinkle, Twinkle Little Star
Picture a deep navy background scattered with tiny gold and cream stars, with a slim crescent moon hanging above the wording. Use flowing script for “Twinkle, Twinkle” and a clean serif font for the event details so the design still feels easy to read.
For a lighter version, switch to an ivory background with pale blue, blush, and gold stars. A few metallic-looking accents can give the invitation a night-sky sparkle without turning it into a heavily decorated celestial theme.
4. What Will Baby Bee?
Build this invitation around one cheerful illustrated bumblebee flying through tiny white flowers. A few pale honeycomb shapes can fade into the background, while mustard yellow, cream, soft brown, and sage green keep the palette warm.
Place “What Will Baby Bee?” in playful lettering near the top, then leave plenty of clean space below for the date, location, and RSVP information. Small dotted flight trails from the bee can lead the eye naturally toward the party details.
5. Boots or Bows
For a rustic celebration, picture a pair of tiny brown cowboy boots on one side of the invitation and a loose watercolor bow on the other. A warm ivory background with touches of dusty rose, denim blue, and tan gives the design a relaxed country feel.
Add a few sprigs of dried grass or wildflowers around the edges instead of using a heavy western border. A headline such as “Boots or Bows? Come Find Out!” immediately explains the theme while leaving the rest of the invitation straightforward.
6. Prince or Princess Storybook
Create the look of the first page of a storybook with a soft cream background, delicate gold stars, and two tiny crowns above the headline. Muted blue and rose can appear only in the crown ribbons rather than covering the entire invitation.
Use elegant serif lettering for the parents’ names and perhaps a short line such as “A Little Royal Surprise Is on the Way.” Keeping the artwork small makes the fairytale theme feel charming rather than costume-like.
7. Touchdowns or Tutus
Give this playful theme a clean illustrated layout instead of covering the invitation in sports graphics. Place a small vintage-style football in one bottom corner and a soft tulle tutu or ballet slipper in the opposite corner.
A pale background with muted pink, blue, tan, and white keeps the contrast lighthearted. Across the center, “Touchdowns or Tutus?” can appear in bold lettering, with the practical party information set beneath it in a much simpler font.
8. Little Cutie Citrus
Imagine the invitation framed by watercolor mandarins, glossy green leaves, and tiny white orange blossoms. Use a creamy white background and let bright orange provide most of the color rather than introducing the usual reveal palette.
“A Little Cutie Is on the Way” makes a natural headline. You could place one sliced orange near the bottom beside the RSVP details to make the card feel fresh and summery without adding more decorative elements.
9. Here’s the Scoop Ice Cream Invitation
Turn the invitation into a tiny retro ice cream-shop moment. Place two illustrated cones in the center—perhaps one strawberry and one blueberry—with pastel sprinkles scattered lightly around them.
Use a soft checkerboard border or rounded vintage lettering for “Here’s the Scoop!” Then put the party information on a cream panel below, almost like the menu board at an old-fashioned ice cream parlor. Mint, vanilla, peach, pink, and blue can all appear together so the palette feels cheerful rather than strictly divided.
10. Something Special Is Brewing
For a brunch reveal, try a warm café-inspired invitation. Picture a ceramic coffee cup viewed from above, sitting beside a tiny spoon and a few coffee beans on a pale linen-colored background.
Steam rising from the cup can subtly form a heart or question mark above the phrase “Something Special Is Brewing.” Use espresso brown, oat beige, cream, and a small touch of muted pink or blue for a cozy invitation that feels especially natural for a late-morning gathering.
11. Autumn Pumpkin Reveal
Skip bright Halloween orange and use a small cluster of watercolor pumpkins in cream, muted rust, sage, and dusty blue. Add a few dried leaves or wispy grasses around the base to give the invitation the look of an autumn table arrangement.
A headline such as “Our Little Pumpkin Has a Surprise” can sit above the illustration. Warm serif lettering and plenty of open cream space keep the design seasonal without making it look like a fall festival flyer.
12. A Little Holiday Surprise
For a December reveal, picture an evergreen branch stretching across the top of the invitation with two hanging ornaments underneath—one blush and one blue. Tiny gold stars or snowflakes can fill a little of the surrounding space.
“Our Merriest Little Surprise” or “One More Gift to Unwrap” can introduce the celebration. Deep green, warm white, muted red, and brushed-gold details create a festive look without requiring traditional gender-reveal colors to dominate the card.
13. Coastal Watercolor
Use a washed watercolor shoreline running along the bottom third of the invitation, with pale aqua water fading into warm sand. A tiny seashell, piece of coral, or starfish can appear beside the date rather than becoming the main illustration.
Choose breezy blue-gray typography and plenty of white space. The phrase “A Little Wave of Excitement Is on the Way” can introduce a beachside or summer celebration while keeping the design relaxed and understated.
14. Wildflower Garden
Frame the invitation with loose watercolor flowers that look as though they were freshly gathered from a garden—daisies, lavender, cosmos, tiny yellow blossoms, and soft greenery. Leave the center almost completely white so the wording does not compete with the flowers.
Instead of organizing the blooms into pink and blue groups, mix lavender, peach, pale yellow, coral, blue, and green naturally around the border. The result feels colorful and celebratory without relying on an obvious two-team design.
15. Storybook Teddy Bear
Place one softly illustrated teddy bear near the bottom of the invitation, perhaps sitting beside two tiny building blocks or holding a small balloon. Give the bear a hand-painted, slightly imperfect look rather than a shiny cartoon finish.
A warm oatmeal background with caramel brown, cream, sage, and faded blue creates a cozy nursery palette. Current invitation collections continue to feature teddy-bear designs, but a restrained composition makes the theme feel especially timeless.
16. Modern Minimalist Reveal
For a completely different look, make typography the design. Use a warm white card with “BOY OR GIRL?” printed in oversized modern letters across the center, perhaps with one word in dusty rose and the other in muted blue.
Place the parents’ names, date, and venue in tiny black or charcoal type underneath. One fine-line heart or question mark is all the decoration you need. This works particularly well for hosts who want the invitation to feel contemporary rather than traditionally baby-themed.
17. Elegant Botanical Invitation
Picture thin watercolor eucalyptus branches growing upward from two opposite corners, leaving a generous blank area in the middle. Add a few olive leaves or tiny white blossoms, but keep the palette almost entirely sage, cream, and soft gray-green.
Set the parents’ names in a refined serif font and use a small script accent only for a phrase such as “A Sweet Surprise Awaits.” This style suits a garden luncheon, restaurant gathering, or smaller celebration where a brightly themed invitation might feel out of place.
18. Ultrasound Photo Reveal
Let the ultrasound image tell most of the story. Place one scan photograph in the upper half of the invitation with a thin white or soft-gray border, almost like a miniature framed print.
Underneath, use a simple headline such as “One Little Question Remains.” The date and location can appear below in clean black lettering. A tiny blush-and-blue heart at the bottom is enough to hint at the reveal without competing with the very personal photograph.
19. Candid Photo Invitation
Choose a natural photograph of the parents-to-be rather than a posed studio image—walking outdoors, sitting together at home, or holding the ultrasound photo. Let the picture fill roughly two-thirds of the card and place the invitation details on a solid band beneath it.
Keep the words minimal because the photograph already provides the emotion. “Our Next Adventure Has a Surprise” or simply “Come Celebrate With Us” can feel more personal than a heavily themed catchphrase.
20. Animated Digital Reveal
For an invitation sent by phone or email, use movement to create a tiny moment of suspense. The card might open on a neutral cream background before pale pink and blue confetti gently drift onto the screen, or a closed illustrated envelope could unfold to reveal the event details.
Another option is a starry design in which tiny stars appear one at a time around the headline. Keep the movement slow and simple so guests can immediately read the date, time, location, and RSVP information. Current digital invitation platforms support gender-reveal designs alongside electronic sending and RSVP tracking, making this format practical as well as playful.
Gender Reveal Invitation Wording Examples
The best wording sounds like the hosts. A backyard party can be light and playful, while a small dinner or garden gathering may call for something more understated. Choose one tone and let the date, location, and RSVP details remain straightforward.
Simple Gender Reveal Wording
Example 1:
Our little secret is almost out! Join us as we celebrate our growing family and share the big reveal.
Example 2:
A little one is on the way. Come celebrate with us and be there when we reveal our special surprise.
Cute Gender Reveal Wording
Example 1:
Tiny kicks, happy hearts, and one sweet surprise. Join us as we celebrate our baby-to-be.
Example 2:
Our family is growing by two little feet. Come celebrate with us as we share the surprise we’ve been waiting for.
Funny Gender Reveal Wording
Example 1:
The guesses are getting serious. Pick your prediction and join us to find out who got it right.
Example 2:
We’ve heard everyone’s predictions. Now it’s time to settle the debate. Join us for the big reveal!
Rhyming Gender Reveal Wording
Example 1:
A little one is on the way,
Come hear the news on reveal day.
Example 2:
One tiny baby, one big surprise,
Come celebrate before our eyes.
Keep rhymes short. One or two lines provide personality without forcing the date, address, and RSVP information into awkward verse.
Elegant Gender Reveal Wording
Example 1:
Please join us for an afternoon celebrating our growing family and a very special surprise.
Example 2:
Together with family and friends, we invite you to celebrate our baby-to-be as we share a joyful moment we’ve been waiting for.
Wording When the Parents Are Being Surprised Too
If the parents-to-be do not know the result, tell guests. This adds to the excitement and reminds anyone who happens to know the secret not to reveal it early.
Example 1:
We’re finding out with you! Join us as we gather with family and friends for a surprise none of us has seen yet.
Example 2:
The secret is being kept from us, too. Come share the moment when we finally find out together.
Gender-Neutral or Baby-Reveal Wording
Families who prefer not to make “boy or girl” the focus can center the invitation on the baby and the shared surprise instead.
Example 1:
Our biggest little surprise is almost here. Join us for a baby reveal and a happy afternoon with family and friends.
Example 2:
Come celebrate our little one and share a special surprise with us.
A Complete Gender Reveal Invitation Example
Our Little Secret Is Almost Out!
Join Emma and Daniel as they celebrate their baby-to-be and share the big surprise.
Saturday, October 10 at 2:00 p.m.
The Garden Room
125 Willow Lane
Wear the color that matches your prediction if you’d like to join the fun.
Please RSVP to Mia by September 26.
This format works because the opening creates excitement while the practical information remains easy to scan.
Digital or Printed Gender Reveal Invitations?
There is no etiquette rule requiring one format over the other. Choose based on your guest list, budget, timing, and the feeling you want the invitation to have.
Digital Invitations
Digital invitations are convenient for casual gatherings and guest lists that are comfortable communicating online. Current online invitation services commonly allow invitations to be sent by email or text while keeping responses and event information together.
They are particularly useful when you want RSVP tracking, reminders, maps, or an easy way to communicate an event update. They also give you room to keep extra instructions away from the main invitation design.
Printed Invitations
Printed invitations make sense when you want something tangible or when the stationery itself is an important part of the celebration. Watercolor artwork, textured paper, botanical illustrations, or a beautifully printed ultrasound image can make the invitation feel like a keepsake.
A printed invitation does not have to mean a formal party, just as a digital invitation does not have to feel casual. Use whichever format best fits the people you are inviting.
Gender Reveal Invitation Etiquette
Good invitation etiquette is mostly about making things easy for your guests.
Give Guests Enough Notice
For a planned baby celebration, sending invitations several weeks ahead gives guests time to arrange their schedules. The Emily Post Institute’s baby shower invitation guidance suggests roughly three to six weeks before a baby shower, which is also a useful planning range for many gender reveal gatherings.
If several guests will need to travel, give them more notice when possible.
Explain What Kind of Celebration It Is
A gender reveal is not automatically a baby shower. If you are combining the two, make that clear so guests understand what they are being invited to.
This is especially helpful when it comes to gifts. A stand-alone reveal does not require guests to assume that presents are expected. If the gathering is also a shower, communicate that naturally rather than leaving people uncertain.
Make the RSVP Easy
Give guests one clear response method and a deadline. The host collecting the responses should be easy to identify, particularly if that person is not one of the parents-to-be.
For digital invitations, RSVP tools can keep responses in one place. Paper invitations can simply include a phone number or email address.
Explain Any Guest Participation
If you want guests to wear pink or blue, choose a prediction, arrive before the reveal begins, or participate in another activity, put the instruction on the invitation.
Make participation optional where possible. Guests should not feel that they need to buy a special outfit or accessory simply to attend.
Protect the Surprise
If a friend, relative, baker, photographer, or host knows the result in advance, make sure everyone involved understands exactly when the secret can be shared.
If the parents are also waiting to find out, a small note on the invitation can prevent an accidental spoiler before the party.
Keep the Invitation Simple
A successful gender reveal invitation does not need several themes, multiple sayings, and a long list of decorative details. Choose one visual direction, add a short opening line, make the event information easy to find, and include only the instructions guests genuinely need.
That leaves you with an invitation that feels personal and celebratory while still doing its most important job: getting everyone to the right place, at the right time, ready to share the moment.