Wedding Planning Spreadsheet: What to Track and How to Organize It
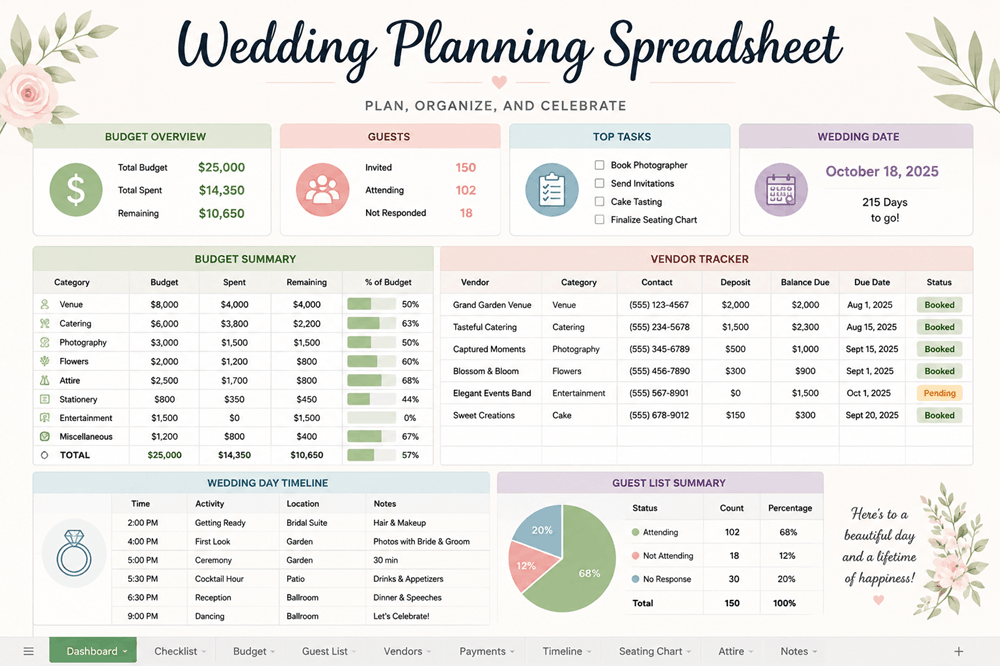
A wedding planning spreadsheet is a single workbook used to organize your budget, guest list, vendors, payments, timeline, seating plan, and other important wedding details.
Instead of keeping information across text messages, notebooks, emails, and separate apps, a spreadsheet gives you one place to see what has been completed, what still needs attention, and how much money remains in the budget.
A useful wedding spreadsheet should include separate tabs for:
- Planning checklist
- Wedding budget
- Guest list
- Vendor contacts
- Payment schedule
- Wedding-day timeline
- Seating plan
- Attire
- Decorations and rentals
- Music and ceremony details
You do not need a complicated system with dozens of pages. The best wedding planning spreadsheet is one that both partners understand and will update consistently.
Why Use a Wedding Planning Spreadsheet?
Wedding planning involves hundreds of small decisions. Some are exciting, such as choosing flowers or tasting cake. Others are easy to overlook, such as checking final payment dates, collecting meal choices, and confirming when rental items will be delivered.
A spreadsheet helps you:
- Keep important information in one place
- Track deadlines
- Compare vendor quotes
- Monitor deposits and balances
- Prevent duplicate purchases
- Record guest responses
- Share responsibilities
- See how one decision affects the rest of the budget
- Give vendors accurate final numbers
It also creates a written record of decisions. If you cannot remember whether the photographer’s final payment is due two weeks or one month before the wedding, you can check the spreadsheet instead of searching through old emails.
What Should a Wedding Planning Spreadsheet Include?
A complete workbook can be divided into several tabs. Each tab should focus on one part of the wedding rather than placing every detail on one long page.
1. Wedding Planning Checklist
The checklist is the main overview of your wedding plan.
Recommended columns include:
| Task | Category | Person responsible | Deadline | Status | Notes |
|---|---|---|---|---|---|
| Reserve ceremony venue | Venue | Both | March 10 | Complete | Contract signed |
| Hire photographer | Photography | Emma | March 25 | In progress | Comparing final two |
| Order invitations | Stationery | Noah | June 1 | Not started | Need final wording |
| Confirm guest count | Guests | Both | August 10 | Not started | After RSVP deadline |
Useful status labels include:
- Not started
- Researching
- In progress
- Waiting for response
- Booked
- Paid
- Complete
- No longer needed
The checklist should contain actions, not broad categories.
Instead of writing:
Flowers
Write:
Request floral proposals from three florists.
Instead of:
Invitations
Write:
Approve invitation wording and send the final guest-address file to the printer.
Specific tasks make it easier to understand what must happen next.
2. Wedding Budget
The budget tab should show both the amount you expect to spend and the amount you actually spend.
Recommended columns include:
| Expense | Estimated cost | Actual cost | Deposit paid | Balance due | Due date | Paid by |
|---|---|---|---|---|---|---|
| Venue | $8,000 | $8,250 | $2,000 | $6,250 | September 1 | Couple |
| Photographer | $3,500 | $3,500 | $1,000 | $2,500 | October 5 | Couple |
| Flowers | $2,200 | |||||
| Invitations | $900 |
Include every expense, even the smaller ones. A budget can be disrupted by items that appear inexpensive individually but add up quickly.
Often-forgotten expenses include:
- Postage
- Invitation samples
- Alterations
- Vendor gratuities
- Marriage-license fees
- Hair and makeup trials
- Delivery charges
- Setup and cleanup fees
- Cake-cutting fees
- Transportation
- Breakfast or lunch for the wedding party
- Welcome bags
- Hotel-room charges
- Accessories
- Taxes and service fees
Add a contingency amount of approximately 5 to 10 percent of your planned budget. This gives you room for price changes, additional guests, replacement items, or details you did not anticipate.
Helpful budget formulas
If your estimated costs are in column B, you can calculate the total with:
=SUM(B2:B40)
If your actual costs are in column C:
=SUM(C2:C40)
To calculate the difference between the estimate and actual cost:
=B2-C2
A negative result means the actual cost is higher than the estimate. A positive result means you spent less than planned.
3. Guest List and RSVP Tracker
The guest-list tab may become one of the most frequently used pages in the workbook.
Recommended columns include:
- Guest number
- Household name
- Individual guest name
- Mailing address
- Email address
- Phone number
- Invitation sent
- RSVP received
- Attending
- Meal choice
- Dietary restrictions
- Plus-one name
- Table assignment
- Gift received
- Thank-you note sent
It is usually better to give each person a separate row, even when invitations are mailed by household.
For example, one invitation may be sent to Jordan and Avery Lee, but they might select different meals or have different dietary needs. Separate rows make those details easier to track.
Count confirmed guests automatically
If the attendance column contains “Yes,” a formula such as the following can count confirmed guests:
=COUNTIF(H2:H200,"Yes")
You can create similar counts for:
- No responses
- Children
- Vegetarian meals
- Hotel rooms
- Plus-ones
- Welcome-event attendance
These totals become especially useful when your venue, caterer, or rental company requests final numbers.
4. Vendor Contact List
A vendor tab should contain all contact and contract information.
Recommended columns include:
| Vendor type | Company | Contact person | Phone | Contract signed | Final payment date | |
|---|---|---|---|---|---|---|
| Venue | Meadow House | Olivia Reed | Yes | September 1 | ||
| Photography | Northlight Studio | Daniel Hart | Yes | October 5 | ||
| Florist | Willow & Stem | Mia Lewis | Pending |
You can also record:
- Website
- Social media account
- Quote received
- Deposit amount
- Cancellation policy
- Arrival time
- Setup requirements
- Insurance documents
- Main contract link
- Emergency contact number
Store the actual contracts in a secure shared folder and place links to them in the spreadsheet. The spreadsheet should summarize the important details, but it should not replace the signed agreement.
5. Vendor Comparison Sheet
Before booking a vendor, create a separate comparison section.
For example, a photographer comparison could include:
| Photographer | Price | Hours | Second photographer | Engagement session | Albums | Travel fees |
|---|---|---|---|---|---|---|
| Studio A | $3,200 | 8 | Included | Included | Extra | None |
| Studio B | $2,800 | 7 | Extra | Included | Included | $250 |
| Studio C | $3,600 | 10 | Included | Extra | Included | None |
Do not compare vendors based only on the final price. Record what each package includes, how communication feels, and whether the vendor’s approach fits your wedding.
The least expensive package may become more costly after adding hours, delivery, travel, staff, or rentals.
6. Payment Schedule
A payment tracker helps prevent missed deadlines and unexpected withdrawals.
Recommended columns include:
- Vendor
- Total contract amount
- Deposit amount
- Deposit date
- Second payment
- Second-payment date
- Final balance
- Final due date
- Payment method
- Confirmation received
- Notes
Sort the sheet by due date so that upcoming payments appear first.
You may also add a reminder to your shared calendar two weeks before each major payment is due. This gives you time to review the contract and confirm that the amount is correct.
Do not mark a payment complete until you have received a receipt or written confirmation.
7. Wedding Timeline
Create one broad planning timeline and one detailed wedding-day timeline.
Planning timeline
The planning timeline tracks major milestones by month.
| Time before wedding | Main tasks |
|---|---|
| 12–18 months | Set budget, create guest estimate, reserve venues |
| 9–12 months | Book photographer, entertainment, planner, and caterer |
| 6–9 months | Choose attire, order stationery, book rentals |
| 3–6 months | Finalize flowers, music, transportation, and ceremony details |
| 1–3 months | Collect RSVPs, confirm menu, create seating plan |
| Final month | Confirm vendors, make final payments, prepare emergency kit |
These timeframes are flexible. A short engagement may require several stages to happen at once, while a long engagement may allow more time between decisions.
Wedding-day timeline
The wedding-day schedule should be detailed enough that vendors and attendants understand where they need to be.
Recommended columns include:
| Time | Activity | Location | People involved | Person responsible | Notes |
|---|---|---|---|---|---|
| 8:00 a.m. | Hair and makeup begins | Bridal suite | Wedding party | Makeup artist | Breakfast available |
| 1:30 p.m. | First look | Garden | Couple, photographer | Photographer | Private |
| 3:30 p.m. | Guest seating begins | Ceremony lawn | Ushers | Coordinator | Music starts |
| 4:00 p.m. | Ceremony | Ceremony lawn | All | Officiant | 30 minutes |
| 6:00 p.m. | Dinner begins | Ballroom | All | Caterer | Speeches after entrée |
Allow extra time between major moments. Hair and makeup, transportation, photographs, and family organization often take longer than expected.
8. Seating Plan
A seating spreadsheet can make a complicated task more manageable.
Begin with these columns:
- Guest name
- Household
- Group or relationship
- Assigned table
- Meal choice
- Accessibility need
- Child seat required
- Notes
You may identify groups such as:
- Immediate family
- Extended family
- College friends
- Work friends
- Neighbors
- Parents’ friends
Try to place every guest with at least one person they know or someone with whom they are likely to feel comfortable.
Avoid using sensitive labels in the spreadsheet. Instead of recording personal conflicts in detail, write a neutral note such as:
Seat at separate tables.
The document may be shared accidentally, so keep comments respectful and practical.
9. Ceremony Planning
The ceremony tab can include:
- Processional order
- Music selections
- Reader names
- Readings
- Vow format
- Ring-bearer instructions
- Officiant contact
- Rehearsal time
- Marriage-license requirements
- Reserved seating
- Cultural or religious traditions
A simple structure might look like this:
| Ceremony element | Selection | Person responsible | Status |
|---|---|---|---|
| Processional music | “Clair de Lune” | Musician | Confirmed |
| First reading | Selected poem | Aunt Maria | Confirmed |
| Vows | Personal vows | Couple | Drafting |
| Recessional | Upbeat instrumental | DJ | Confirmed |
Share the final version with the officiant and ceremony coordinator before the rehearsal.
10. Music List
Your music sheet should identify more than just favorite songs.
Create separate sections for:
- Prelude
- Processional
- Entrance
- First dance
- Parent dances
- Dinner
- Cake cutting
- Bouquet toss
- Last dance
- Do-not-play songs
Recommended columns include:
| Moment | Song | Artist | Exact version | Start point | Confirmed |
|---|
The “exact version” column matters because acoustic, live, remastered, explicit, and radio versions may sound very different.
If a song must begin at a specific lyric or instrumental section, record the timestamp.
11. Attire Tracker
Wedding attire often involves several appointments and payment deadlines.
Track:
- Person
- Garment
- Store or designer
- Order date
- Expected arrival
- Alteration appointment
- Final fitting
- Pickup date
- Cost
- Accessories
- Status
Include shoes, jewelry, undergarments, ties, pocket squares, veils, hair accessories, and weather-related items.
For wedding-party attire, record whether each person has:
- Been measured
- Placed the order
- Paid
- Scheduled alterations
- Collected the garment
This allows you to follow up with the correct person instead of sending repeated reminders to the entire group.
12. Decorations, Flowers, and Rentals
This tab helps you see what is needed in each space.
Recommended columns include:
| Item | Quantity | Location | Source | Delivery time | Setup person | Return required |
|---|---|---|---|---|---|---|
| Welcome sign | 1 | Entrance | Purchased | N/A | Coordinator | No |
| Table numbers | 15 | Reception tables | DIY | N/A | Wedding party | No |
| Candle holders | 45 | Reception tables | Rental company | 10 a.m. | Florist | Yes |
Organize the sheet by location:
- Ceremony entrance
- Ceremony seating
- Altar or backdrop
- Cocktail hour
- Reception tables
- Gift table
- Guest-book table
- Bar
- Dessert area
- Restrooms
- Exit
This prevents decorations from being purchased without a clear destination.
How to Build a Wedding Spreadsheet
You can create the workbook in Microsoft Excel, Google Sheets, Apple Numbers, or another spreadsheet program.
Step 1: Create the essential tabs
Start with only the pages you need immediately:
- Checklist
- Budget
- Guest list
- Vendors
- Payments
Add the timeline, seating plan, music, and decoration tabs later.
Step 2: Use consistent status labels
Choose the same labels throughout the workbook.
For example:
- Not started
- In progress
- Waiting
- Confirmed
- Complete
Consistent terms make it easier to filter and sort tasks.
Step 3: Add colors carefully
Color can help, but too many colors make the document harder to read.
A simple system might be:
- Red for overdue
- Yellow for in progress
- Green for complete
- Gray for no longer required
Do not rely on color alone. Always include a written status so the sheet remains understandable when printed or viewed by someone with color-vision differences.
Step 4: Freeze the header row
Freezing the top row keeps column labels visible as you scroll through long guest or budget lists.
Step 5: Add filters
Filters allow you to view only:
- Unpaid balances
- Guests who have not responded
- Tasks assigned to one partner
- Deadlines within the next month
- Vendors awaiting confirmation
Step 6: Protect formula cells
If the spreadsheet is shared with several people, protect cells containing totals and formulas. This prevents someone from accidentally deleting an important calculation.
Who Should Have Access?
The couple should decide who needs editing access and who only needs to view the information.
Possible collaborators include:
- Wedding planner
- Parents
- Ceremony coordinator
- Maid of honor
- Best man
- Venue manager
Not every person needs access to the full workbook. The budget may contain private financial information, while the wedding party may only need the schedule and attire tabs.
Create a separate view or document for vendors rather than sharing your entire planning file.
How Often Should You Update It?
Update the spreadsheet whenever you:
- Sign a contract
- Make a payment
- Receive an RSVP
- Change the budget
- Complete a task
- Schedule an appointment
- Confirm a vendor detail
During the early planning stages, reviewing the workbook once a week may be enough. In the final month, check it every few days.
Set aside a regular time to review it together. A 20-minute weekly planning session can prevent one partner from carrying all the information mentally.
During that meeting, ask:
- What was completed this week?
- What is due next?
- Are any payments approaching?
- Are we waiting for a response?
- Has the budget changed?
- Does either person need help with an assigned task?
Common Wedding Spreadsheet Mistakes
Making the workbook too complicated
A spreadsheet with 25 tabs, multiple dashboards, and difficult formulas may look impressive but become frustrating to maintain.
Only track information that will help you make a decision or complete a task.
Forgetting to update actual costs
A budget is not useful if it shows only estimates. Enter the final price whenever a contract is signed or a purchase is made.
Keeping incomplete guest names
Record full names as early as possible. This helps with invitations, place cards, seating charts, and thank-you notes.
Recording the contract price without extra fees
Taxes, service charges, delivery fees, overtime, gratuities, and required rentals can substantially change the final total.
Giving too many people editing access
Accidental changes are more likely when several relatives or attendants can edit the main workbook.
Tracking deadlines without reminders
A spreadsheet records a due date, but it may not alert you automatically. Add important deadlines to a shared digital calendar.
Failing to create a backup
Keep the spreadsheet in cloud storage or save a backup copy regularly. Losing the guest list or payment record shortly before the wedding can create unnecessary stress.
Frequently Asked Questions
What is the most important tab in a wedding planning spreadsheet?
The budget, guest list, and checklist are usually the most important. These three pages affect nearly every other wedding decision.
Should both partners use the spreadsheet?
Ideally, yes. Both partners should know where important information is stored and understand the current budget, deadlines, and responsibilities.
Can I plan a wedding using only a spreadsheet?
A spreadsheet can organize most planning information, but you will still need contracts, emails, calendar reminders, and conversations with vendors. Think of the workbook as the central index for the wedding rather than the only planning tool.
When should I start the wedding spreadsheet?
Create it as soon as you begin discussing the budget, guest count, or venue. Early estimates do not need to be perfect. They can be updated as plans become clearer.
Should I include vendor passwords or banking details?
No. Do not store passwords, complete card information, Social Security numbers, or sensitive banking details in a shared wedding spreadsheet.
Keep the Spreadsheet Useful, Not Perfect
A wedding planning spreadsheet should reduce stress, not become another project that requires constant attention.
Begin with the five essential tabs: checklist, budget, guest list, vendors, and payments. Add more pages only when they solve a real planning problem.
Keep entries specific, record actual costs, assign responsibilities, and review the workbook regularly. When the information is current and easy to understand, the spreadsheet becomes more than a list—it becomes a practical map of the entire wedding.