Party Planning Checklist: Everything to Do Before Your Event
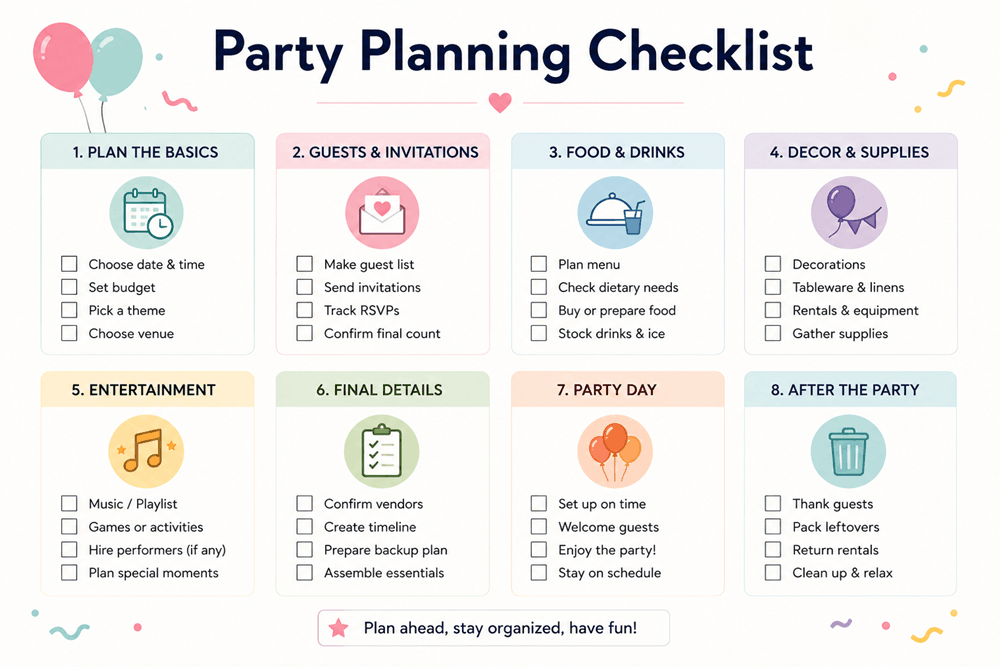
A party planning checklist helps you organize the budget, guest list, venue, invitations, food, decorations, entertainment, and event-day schedule without overlooking important details.
For most parties, begin planning four to eight weeks in advance. Larger celebrations, milestone birthdays, formal dinners, and events requiring popular venues or vendors may need several months of preparation.
The essential party-planning steps are:
- Set the purpose, date, and budget.
- Estimate the number of guests.
- Reserve the venue.
- Choose a theme or overall style.
- Send invitations.
- Plan food and drinks.
- Arrange entertainment and activities.
- Order decorations, rentals, and supplies.
- Confirm vendors and guest numbers.
- Prepare an event-day timeline and cleanup plan.
The following checklist can be adapted for a small gathering at home or a larger professionally hosted celebration.
Quick Party Planning Checklist
Party basics
- Decide what you are celebrating.
- Choose a date and start time.
- Decide when the party will end.
- Set a total budget.
- Estimate the number of guests.
- Choose a venue.
- Decide whether the event will be formal or casual.
- Select a theme, color palette, or general atmosphere.
Guests and invitations
- Create the guest list.
- Collect addresses, phone numbers, or email addresses.
- Choose printed or digital invitations.
- Include the date, time, location, dress code, and RSVP information.
- Send invitations.
- Record responses.
- Follow up with guests who have not replied.
- Confirm the final number of attendees.
Food and drinks
- Choose a meal, buffet, appetizers, or snacks.
- Ask about allergies and dietary restrictions.
- Hire a caterer or create a preparation schedule.
- Order the cake or desserts.
- Plan alcoholic and nonalcoholic drinks.
- Buy ice.
- Arrange serving dishes, utensils, plates, cups, and napkins.
- Prepare a plan for storing leftovers.
Decorations and setup
- Choose table linens and centerpieces.
- Order balloons, flowers, signs, banners, or other decorations.
- Confirm tables and chairs.
- Arrange lighting.
- Prepare gift, food, dessert, and drink areas.
- Create a setup diagram.
- Assign people to help decorate.
- Gather tape, scissors, hooks, extension cords, and other supplies.
Entertainment and activities
- Create a music playlist.
- Hire a DJ, band, entertainer, photographer, or activity provider.
- Plan games or activities.
- Prepare prizes or favors.
- Test sound and presentation equipment.
- Create a schedule for speeches, cake cutting, or special moments.
Final preparations
- Confirm all vendors.
- Make final payments when required.
- Check the weather.
- Prepare an indoor or backup plan.
- Buy last-minute groceries and supplies.
- Clean and organize the venue.
- Charge phones, speakers, cameras, and other devices.
- Prepare an emergency kit.
- Print the timeline and contact list.
- Assign setup, hosting, and cleanup responsibilities.
Eight to Twelve Weeks Before the Party
Large celebrations should begin with the decisions that affect everything else.
Define the purpose of the party
Be clear about what you are planning.
Possible occasions include:
- Birthday
- Anniversary
- Engagement
- Graduation
- Retirement
- Baby shower
- Bridal shower
- Holiday gathering
- Housewarming
- Farewell party
- Family reunion
- Work celebration
The occasion influences the venue, guest list, wording, food, schedule, and level of formality.
A child’s birthday party may need a short afternoon schedule and structured activities. An anniversary dinner may require formal seating, speeches, flowers, and a longer meal.
Set the budget
Decide how much you can comfortably spend before booking a venue or ordering decorations.
A basic party budget may include:
| Expense | Estimated amount | Actual amount | Paid |
|---|---|---|---|
| Venue | |||
| Food | |||
| Drinks | |||
| Cake and desserts | |||
| Invitations | |||
| Decorations | |||
| Entertainment | |||
| Rentals | |||
| Favors | |||
| Photography | |||
| Miscellaneous |
Reserve approximately 5 to 10 percent of the budget for unexpected expenses. Delivery charges, taxes, service fees, extra guests, replacement supplies, and last-minute purchases can increase the final cost.
Create a preliminary guest list
You need an approximate guest count before choosing a venue or ordering food.
Divide the list into:
- Must-invite guests
- Additional guests if space allows
- Children
- Plus-ones
- Hosts and helpers
- Vendors who may require meals
Do not assume every invited person will attend. However, choose a venue that can safely accommodate the maximum realistic number.
Choose the date and time
Before confirming the date, consider:
- Holidays
- School schedules
- Major local events
- Religious observances
- Travel requirements
- Venue availability
- The guest of honor’s schedule
Choose both a starting and ending time. An end time helps guests plan transportation, childcare, and other commitments.
Reserve the venue
Possible venues include:
- Your home
- Restaurant
- Private dining room
- Community hall
- Park
- Garden
- Hotel
- Event space
- Recreation center
- Museum or gallery
- Activity venue
Before booking, ask about:
- Maximum capacity
- Rental hours
- Setup and cleanup time
- Food and drink policies
- Alcohol restrictions
- Parking
- Accessibility
- Noise limits
- Tables and chairs
- Kitchen access
- Decorations
- Insurance
- Security
- Cancellation terms
- Weather alternatives
Confirm what is included in the rental price. A less expensive venue may cost more after adding furniture, linens, staff, or equipment.
Six to Eight Weeks Before the Party
Once the date and venue are secure, begin shaping the guest experience.
Choose the theme or style
A theme is optional. A simple visual direction may be enough.
You might choose:
- Garden party
- Dinner under the stars
- Vintage celebration
- Tropical gathering
- Afternoon tea
- Movie night
- Black-and-gold milestone party
- Rustic picnic
- Favorite color palette
- Seasonal theme
Avoid choosing a theme that requires every item to match perfectly. A consistent color palette, invitation style, and centerpiece design can create a polished atmosphere without excessive spending.
Plan the invitations
Every invitation should clearly include:
- Guest of honor
- Occasion
- Date
- Start and end time
- Venue name
- Full address
- RSVP deadline
- Contact information
- Dress code, if relevant
- Instructions for gifts, food, or activities
- Whether children or plus-ones are included
For example:
Please join us for an evening celebrating Maria’s 40th birthday on Saturday, October 10, from 6:00 to 10:00 p.m. at Willow House, 18 Garden Lane. Dinner and dancing will follow. Cocktail attire. Kindly reply by September 20.
Send invitations early enough for guests to respond, but not so early that they forget.
A general timeline is:
| Type of party | Suggested invitation timing |
|---|---|
| Casual gathering | 2–4 weeks before |
| Birthday party | 3–6 weeks before |
| Shower | 4–8 weeks before |
| Formal dinner | 6–8 weeks before |
| Holiday party | 4–8 weeks before |
| Large milestone event | 8–12 weeks before |
Give guests a clear RSVP deadline, usually one to three weeks before the party.
Begin contacting vendors
Depending on the event, you may need:
- Caterer
- Baker
- Bartender
- DJ or band
- Photographer
- Florist
- Balloon decorator
- Rental company
- Entertainer
- Security staff
- Transportation provider
- Cleanup service
Request written estimates and confirm exactly what each price includes.
Record:
- Contact name
- Phone number
- Email address
- Arrival time
- Deposit
- Final payment
- Cancellation policy
- Setup requirements
- Equipment needs
Four to Six Weeks Before the Party
This is the stage for planning the food, entertainment, and physical layout.
Plan the Menu
Choose food according to the event time and length.
Morning party
Consider:
- Pastries
- Fruit
- Yogurt
- Breakfast sandwiches
- Coffee
- Tea
- Juice
Afternoon party
Consider:
- Finger foods
- Sandwiches
- Salads
- Fruit
- Snack boards
- Cake
- Lemonade
Evening party
Consider:
- Appetizers
- Buffet or plated dinner
- Side dishes
- Desserts
- Coffee
- Alcoholic and nonalcoholic drinks
Guests are likely to expect a full meal when a party takes place during a typical lunch or dinner period. If you are serving only snacks or dessert, make that clear in the invitation.
Ask about dietary needs
Track:
- Food allergies
- Vegetarian meals
- Vegan meals
- Gluten-free needs
- Religious dietary restrictions
- Children’s meals
Avoid labeling dishes only by appearance. Small menu cards can help guests understand what each item contains.
Estimate quantities
The amount needed depends on the event length, menu, and time of day.
As a general planning guide:
- Allow more food for a meal-time event.
- Offer several choices rather than a large amount of one item.
- Include substantial non-meat options.
- Provide more water than you think you will need.
- Order a slightly larger cake if the guest count is uncertain.
- Ask the caterer how staff meals are handled.
Do not forget condiments, serving utensils, takeaway containers, and storage space.
Choose Drinks
Offer a balanced selection, such as:
- Water
- Sparkling water
- Soft drinks
- Juice
- Tea
- Coffee
- Mocktails
- Beer, wine, or cocktails when appropriate
If alcohol is served, provide appealing nonalcoholic choices rather than treating water as the only alternative.
Also plan for:
- Ice
- Garnishes
- Bottle openers
- Corkscrews
- Cups or glassware
- Cocktail napkins
- Drink labels
- Designated drivers or transportation information
Plan Entertainment
Entertainment should fit the guests and the length of the event.
Possible options include:
- Playlist
- Live band
- DJ
- Karaoke
- Photo booth
- Trivia
- Lawn games
- Craft station
- Magician
- Character performer
- Dance instructor
- Slideshow
- Memory table
- Guest-book activity
Do not overfill the schedule. Guests usually need unstructured time to talk, eat, and enjoy the atmosphere.
For a two-hour children’s party, structured activities may be helpful. For an adult dinner, one or two planned moments may be enough.
Create the Layout
Sketch where the main elements will go:
- Guest entrance
- Welcome table
- Coat area
- Food
- Drinks
- Seating
- Cake or dessert
- Gifts
- Activities
- Entertainment
- Restrooms
- Trash and recycling
- Emergency exit
Make sure guests can move comfortably without blocking food stations or doorways.
Place drinks away from the main food table when possible. This prevents one long line from forming.
Two to Four Weeks Before the Party
By this point, the major decisions should be made. Focus on confirmations and detailed preparation.
Track RSVPs
Create a simple guest tracker:
| Guest | Invited | Response | Number attending | Dietary needs |
|---|---|---|---|---|
| Jordan Lee | Yes | Attending | 2 | Vegetarian |
| Ava Brown | Yes | No response | ||
| Daniel Smith | Yes | Not attending | 0 |
Follow up politely after the RSVP deadline:
Hello, Ava. We are confirming the final guest count for Saturday’s celebration and wanted to see whether you will be able to join us. Please let us know by tomorrow. We would love to celebrate with you.
Do not assume that silence means attendance.
Order decorations and supplies
Possible items include:
- Tablecloths
- Centerpieces
- Flowers
- Balloons
- Candles
- Signs
- Banners
- Place cards
- Menu cards
- Cake stand
- Serving trays
- Guest book
- Favors
- Photo backdrop
Before purchasing, check what you already own and what the venue provides.
Create a decoration list by location:
| Area | Items needed |
|---|---|
| Entrance | Welcome sign, balloons |
| Dining tables | Linens, centerpieces, candles |
| Dessert table | Cake stand, plates, serving knife |
| Gift table | Sign, basket for cards |
| Activity area | Supplies, instructions, prizes |
This is more useful than buying decorations without knowing where they will be placed.
Confirm equipment
Depending on the party, you may need:
- Speaker
- Microphone
- Extension cords
- Projector
- Screen
- Lighting
- Power strips
- Coolers
- Heaters
- Fans
- Tent
- Generator
Test borrowed or rented equipment before the event whenever possible.
One Week Before the Party
The final week should be used for confirmations, shopping, and advance preparation.
Confirm vendors
Contact each vendor and confirm:
- Date
- Address
- Arrival time
- Contact person
- Services ordered
- Final guest count
- Setup location
- Remaining balance
- Special instructions
Do not rely on an old email thread. A final confirmation can prevent misunderstandings.
Prepare the event timeline
A basic party timeline may look like this:
| Time | Activity |
|---|---|
| 2:00 p.m. | Setup begins |
| 4:30 p.m. | Vendors arrive |
| 5:30 p.m. | Final walkthrough |
| 6:00 p.m. | Guests arrive |
| 6:30 p.m. | Food service begins |
| 7:30 p.m. | Toasts |
| 7:45 p.m. | Cake cutting |
| 8:00 p.m. | Music and dancing |
| 9:45 p.m. | Final announcement |
| 10:00 p.m. | Party ends |
| 10:00 p.m. | Cleanup begins |
Share the timeline with anyone helping on the day.
Assign responsibilities
The host should not be responsible for every detail while also greeting guests.
Assign someone to:
- Meet vendors
- Direct parking
- Manage music
- Refill drinks
- Watch the gift table
- Organize activities
- Take photographs
- Distribute favors
- Pack leftovers
- Lead cleanup
Choose people who understand the task and are willing to help.
Prepare an emergency kit
Include:
- Tape
- Scissors
- Safety pins
- Stain remover
- Paper towels
- Trash bags
- Extension cords
- Phone chargers
- Batteries
- Matches or lighter
- First-aid supplies
- Pain reliever
- Sewing kit
- Extra pens
- Printed contact list
Keep the kit in a clearly labeled container.
One or Two Days Before the Party
Complete as much work as possible before the event day.
- Clean the venue or party area.
- Pick up rentals.
- Buy fresh food and ice.
- Prepare foods that can be safely made in advance.
- Chill drinks.
- Arrange flowers.
- Assemble favors.
- Wrap gifts.
- Label serving dishes.
- Organize decorations by area.
- Charge electronics.
- Print the guest list and timeline.
- Check the weather.
- Confirm the backup plan.
- Remove unnecessary furniture.
- Prepare space for coats and bags.
Place each group of supplies in a separate box labeled by location, such as “dessert table,” “entrance,” or “children’s activities.”
This saves time during setup and makes it easier for helpers to work independently.
Party-Day Checklist
Before guests arrive
- Begin setup early.
- Arrange tables and chairs.
- Decorate the entrance.
- Set out signs.
- Prepare the food and drink stations.
- Test music and equipment.
- Adjust lighting.
- Check restrooms.
- Place trash and recycling bins.
- Store personal and valuable items securely.
- Review the timeline.
- Confirm that vendors know whom to contact.
- Take photographs before guests arrive.
During the party
- Welcome guests.
- Introduce people when helpful.
- Watch the food and drink supply.
- Keep pathways clear.
- Follow the timeline without making it feel rigid.
- Check on the guest of honor.
- Make announcements before important moments.
- Photograph key details.
- Address spills and hazards quickly.
- Allow time for guests to relax.
At the end
- Thank guests for attending.
- Distribute favors.
- Arrange transportation when needed.
- Collect gifts and cards.
- Store leftover food safely.
- Remove decorations.
- Check for personal belongings.
- Return furniture to its original position.
- Separate rented items.
- Dispose of trash and recycling.
- Confirm the venue is secure.
Planning an Outdoor Party
Outdoor events need an additional weather plan.
Consider:
- Rain
- Wind
- Heat
- Cold
- Mud
- Insects
- Darkness
- Uneven ground
- Limited electricity
- Restroom access
Prepare:
- Tent or indoor alternative
- Umbrellas
- Fans or heaters
- Sunscreen
- Bug repellent
- Weighted decorations
- Outdoor lighting
- Drinking water
- Covered food containers
- Secure trash bins
Choose a firm deadline for deciding whether to move the party indoors. Waiting until guests begin arriving can create unnecessary confusion.
Common Party Planning Mistakes
Inviting guests before confirming the venue
Do not send invitations until you know the location, date, and capacity are secure.
Forgetting the event’s end time
An open-ended invitation can make transportation, staffing, venue rental, and cleanup more difficult.
Planning too many activities
A crowded schedule can make the party feel rushed. Leave room for natural conversation and delays.
Ignoring dietary restrictions
Offer at least one satisfying option for guests who cannot eat the main dish.
Underestimating setup time
Decorating, arranging food, testing equipment, and solving last-minute problems often take longer than expected.
Doing everything yourself
Ask for help or hire support where the budget allows. The host should be able to participate in the celebration.
Spending heavily on low-impact details
Prioritize the elements guests notice most: comfort, food, music, lighting, and hospitality.
Forgetting cleanup
Decide in advance who will remove decorations, return rentals, pack gifts, and dispose of trash.
Frequently Asked Questions
How early should I start planning a party?
Begin four to eight weeks before most parties. Start several months ahead for large events, milestone celebrations, formal dinners, or gatherings requiring popular venues and vendors.
What should I plan first?
Start with the budget, guest estimate, date, and venue. These decisions affect almost every other part of the event.
How much food should I order?
The amount depends on the event time, length, menu, and guest ages. Ask your caterer for recommendations and provide the final attendance number by the agreed deadline.
When should invitations be sent?
Send invitations approximately two to eight weeks before the event, depending on its formality and whether guests need to travel.
How do I keep party planning organized?
Use one checklist or spreadsheet containing tasks, deadlines, responsible people, guest responses, vendor information, and payments. Review it regularly instead of keeping details in separate messages and notes.
A Good Checklist Leaves Room to Enjoy the Party
The purpose of a party planning checklist is not to make every detail perfect. It is to prevent important responsibilities from being forgotten and to reduce the number of decisions you must make at the last minute.
Begin with the date, budget, guest list, and venue. Then organize invitations, food, entertainment, decorations, supplies, and responsibilities in a realistic timeline.
Complete as much preparation as possible before the event day, assign help clearly, and keep the schedule flexible. When the practical details are under control, you can spend less time solving problems and more time celebrating with your guests.